You can either record audio using the built-in tool or a third-party Windows 11 audio recorder. In this post, we share a few steps that will help you record the audio easily.
How to record audio in Windows 11?
1. Using the voice recorder app
Windows 11 comes with a built-in Voice Recorder app. It is now known as the Sound Recorder app and comes with a new design language. However, if you have uninstalled the app, you need to download it again. You can download the app from the Microsoft store. Follow the steps below.
Go to the Microsoft Store and find Windows Voice Recorder
Next, open Windows Voice Recorder and tap on the install button
Once you have downloaded the voice recorder app, you can proceed to record the audio by following these steps.
Press the Windows key and type “sound” or “voice”. Next, click on “Sound Recorder” or “Voice Recorder”.
The app will then update itself to the latest version of Voice Recorder.Next, launch the Sound Recorder app. You can choose the recording device from the drop-down menu at the bottom-left corner. At the bottom, you should see a “record” button. Click on it. To stop recording, click on it again.
To open the file, simply right-click on the recorded audio and go to the file location.
Usually, the recorded audio will be saved in the “user profile> Documents> Sound recordings” folder.
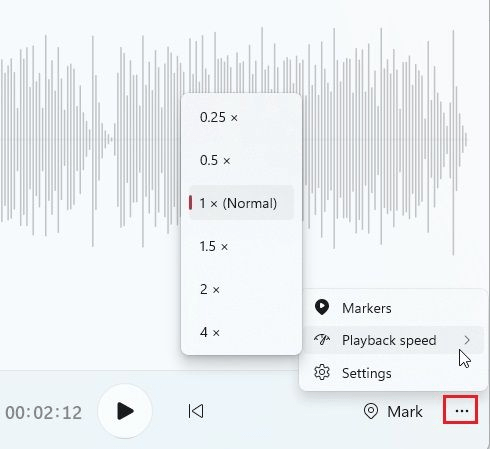
To change the playback speed or to mark the audio intervals with timestamps, go to the three-dot menu at the bottom-right corner.
To change the recording quality, go to “Settings” within the app or you can access the “Settings” from the three-dot menu at the bottom right corner. You can then choose the audio format you want.
That’s it! This is how to record audio on Windows 11 using the built-in sound recorder. Interestingly, the Sound Recorder app in Windows 11 supports recording in different formats such as MP3, WAV, FLAC, WMA, M4A, and more. Also, it allows you to choose the audio quality ranging from auto, and medium to high. The best part about this app is that it lets you change the recording device within the app.
2. Using a third-party app
You can download and install any third-party app via Microsoft Store and use it to record audio on Windows 11. Once the app is installed, open it and learn how to use it. However, first, choose the input source for recording the audio (near the microphone icon at the top). Record your audio and then choose a folder to save it. So, this is how you record your audio using a third-party app. We recommend you go through the instructions thoroughly before using the app. Conclusion So, these are the two best ways- how to record audio in Windows 11. While the Sound Recorder app is an excellent choice, you can opt for a third-party app if you want more features. Do share your experience with us in the comment section below.
![]()
![]()


![]()
