How to Take a Screenshot on a Mac?
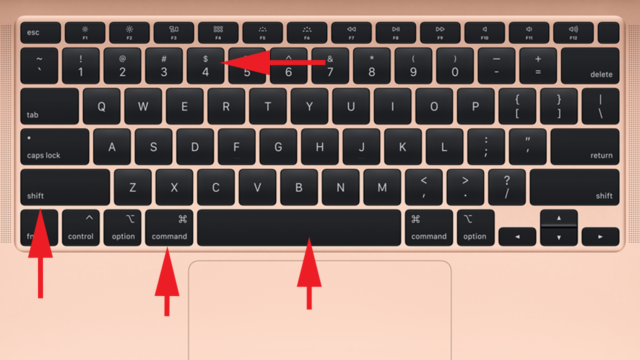
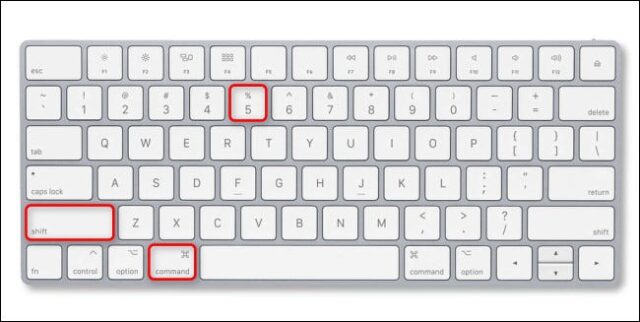
Open the screenshot tool by navigating to Launchpad>Other>Screenshot or you can use the keyboard shortcut Shift + Command + 5. A floating toolbar will pop up on the screen and shall offer you options to grab the entire screen, a custom section, or a selected window. Capturing video of a custom selection or the entire screen is possible as well. Grab the Entire Screen– Click on the Capture Entire Screen button and press Capture. Or else, use the shortcut Shift + Command + 3 to take a screengrab instantly. Capture a Custom Selection– Click on the Capture Selected Window to capture a chosen part of the screen. Alternately, you can press Shift + Command + 4. This will make your pointer change to a cross-hair. Click and drag the cross-hair to cover the area you want to capture. Let go to grab the area selected or press the Esc key if you want to cancel. Hold down the Shift, Option, or Space Bar to change the size, shape, and position of the selected area before taking the image. Capture a Window or Menu– Press Shift + Command + 5 and click on the option Capture Selected Window in the toolbar. The pointer will turn into a camera icon. Move the icon over the window to highlight the same. Then click to save the image. You can switch back and forth between grabbing a particular menu and capturing a custom selection by pressing the space bar. Take an Image of the Touch Bar– If you own a Mac with a Touch Bar, you can take its screenshot by pressing Shift + Command + 6. Record Video– Press Shift + Command + 5 and then select Record Selected Portion or Record Entire Screen. Click on Record to start capturing the video when everything is ready. Click on the Stop icon in the menu bar of the macOS to terminate the recording and save the .MOV file.
Alternative Option
There are free and paid screen capture apps that you can use as well. Snagit is one such third-party app that offers everything you need. However, it costs $ 50. You can choose the free app called TechSmith Capture previously known as Jing from the same company. Other free apps include LightShot and Skitch.
Change Image Format
Screenshots are saved as .png files by default on Mac. These can get really big, especially if you have a large Retina display monitor. Do a little coding to switch to .jpg format. Go to Launchpad>Other>Terminal and type the following inside the window: defaults write com.apple.screencapture type jpg If prompted type your password and restart the computer. All screenshots from now on would be saved in your preferred format. If you want to change it back again to .png, type the following inside the window: defaults write com.apple.screencapture type png We have tried to guide you on how to take a screenshot on a Mac in the easiest way possible. However, if you still have some queries on how to take a screenshot on MacBook, let us know in the comments section below.
![]()
![]()


![]()
